Posted on — Leave a comment

Chocolate whoopies filled with orange custard

The whoopie pie is a US baked good that may be considered a cookie, pie or a cake, that comes from the Amish tradition.

IMG_20150408_204726

Amish women would bake these desserts and put them in lunch boxes for the farmers; when the farmers would find the treats in their lunch, they would shout: Whoopie!

IMG_20150408_204510

The whoopies remind me of macarons, but only because of the shape, since the way of making them is different, a bit easier I would say (yey!).

IMG_20150408_205543

Anyway, these cookies, pies or cupcakes (whatever you want to call them), are delicious and elegant and you can always use your imagination to make the filling or the cookies with different ingredients.

IMG_20150408_175658

Here I tell you the recipe with some tips:

Ingredients for the filling:

1 orange

80 gr butter

50 gr sugar

1 egg

100 gr of cream cheese

Ingredients for the cookies:

125 gr of flour

1/2 sachet of baking powder

40 gr butter

40 gr sugar

1 egg

100 gr chocolate spread

20 gr of cocoa powder

100 ml of milk

a pinch of salt

First make the custard: grate the skin of the orange, then squeeze the juice and set it aside. Melt the butter, then add the sugar, the egg, the orange zest and the juice. Stir constantly until it gets thicker. Remove from the fire and let the mixture cool down; after that add the cream cheese, mix well, and let it chill in the fridge.

IMG_20150408_204709

Tip: if your custard doesn´t get thick enough (as has happened to me), you can add powdered sugar or cornstarch (maizena) while it´s on the fire.

Time to bake cookies! Sift the flour with the baking powder and add a pinch of salt. In a different bowl, mix the butter and the sugar, then add the egg, the chocolate spread, cocoa and the milk. Mix well and add to the dry ingredients from before.

IMG_20150408_205308

So, now we have the dough to make the cookies, it´s a bit liquid but it´s ok like this. Now, put baking paper on the oven tray and with the help of the pastry bag start making the circles. Just hold the pastry bag straight for a few seconds and press slightly to release the dough.

Tip: make the circles small, they will rise in the oven and will stick to each other if you make them too big (also happened to me a few times :))

IMG_20150408_201634

Put the cookies in the oven (preheated at 180º C) for about 10 minutes. Take them out and let them cool down, so you can take them off the baking paper easily. Now you can fill them with the orange custard.

Eat, enjoy!

IMG_20150408_210116

Have a nice day!

Posted on — Leave a comment

Smoothie Detox

When it´s time for a nice smoothie, here I am , no one can´t stop me; I start cutting fruits and vegetables until I have a good bunch, then throw them into the blender so I can enjoy the explosion of all the vitamins and antioxidants. Of course, if anybody else is in the room with me, I´ll make sure that they have a good portion as well.

IMG_20150403_124106

Today just a short recipe to start well the week after the Easter holidays that some of you enjoyed the past days, a detox smoothie that will give you the energie that you need to deal with a new day!!

IMG_20150403_121942

I do not have a specific recipe, I just use the fruits and vegetables that I have at home at that moment. Here, I show you one of many: easy, healthy and delicious!

IMG_20150403_122811

The ingredients that I´ve used this time are: strawberries, apple, banana, cucumber and cranberries. I also added flax seeds, a teaspoon of maca, coconut and biological hemp seeds.

IMG_20150403_124443IMG_20150403_123940

I added soy mil, but you can also add water instead. Everything goes to the blender..and voilá! good for any time of the day!

Have a good week!

Posted on — Leave a comment

Sweet bread crown for Easter

As Easter approaches, I can´t help imagine myself having breakfast in my parents’ house having a good piece of the traditional Easter brioche followed by another one, and another…before going out and see how my childhood village fills up with people getting ready to celebrate, making plans and enjoying the great atmosphere that precedes the celebrations.

IMG_20150329_183140
Sweet bread crown for Easter

IMG_20150329_182555

Pity that this year I cannot join, but that doesn´t mean that I won´t enjoy a good traditional sweet…or…more than one 😉

IMG_20150329_182002

Last year, around this time, I published the typical Easter sweet bread that you can eat in Spain during Easter, you can find the recipe here.

This year I wanted to make something different, so I kind of came up with this crown of sweet bread based on the famous Swedish cinnamon rolls. Here I explain how I did it:

Ingredients for the dough:

2 tablespoons of butter cut into cubes

225 g of flour

Half a teaspoon of salt

1 sachet of baking powder

1 egg, whisked

125 ml of warm milk

Ingredients for the filling:

4 teaspoons of butter (room temperature)

2 tablespoons of cinnamon

50g of brown sugar

The zest of one lemon and the zest of one orange

1 grated or finely chopped apple

Sieve the flour together with the salt, then add the baking powder and the butter, mix well with the help of your hands, later add the egg and the warm milk and keep kneading until you get a smooth and elastic dough.

Leave the dough in a bowl for at least 40 minutes in a warm place covered with a clean cloth until the dough doubles in volume.

IMG_20150329_154342

After that, knead again for a minute and stretch the dough with the help of a kitchen roller.

For the filling: mix the sugar and the butter and add the rest of the ingredients: cinnamon, lemon zest, orange zest and the grated apple.

IMG_20150329_165403
Roll the dough to get a tube shape

IMG_20150329_165601

Roll the dough gently untlil you have a tube shape. Now cut with a sharp knife into pieces  (I got  12 pieces removing the edges). Place the rolls in a previously greased round mold and put it in the oven for about 25-30 minutes at 190ºC.

IMG_20150329_170012

IMG_20150329_182953
Brush it with some syrup or honey

Let cool down and brush it with some syrup or honey…done! just eat and enjoy.

This dessert is going to be sold for the cancer foundation in Belgium (Kom op tegen Kanker), so I´m glad that I helped to support this good cause.

IMG_20150329_182457 IMG_20150329_183639

Have a good week!

Posted on — Leave a comment

Crème Brûlée

Crème Brûlée, also know as burnt cream, is a cream made by egg yolks, which surface is dusted with sugar, burned afterwards to create a layer of crunchy caramel on top of the cream. (Anybody drooling already?)

IMG_20150326_120240

The earliest known reference comes from France, although, some say that its origins are english (Crème anglaise), and others think that is just the adaptation of the Spanish Crema Catalana.

IMG_20150326_120205

IMG_20150326_120029

In any case, regardless of its origins, I hope you are already thinking about trying to make it at home. I think it´s a nice dessert for a fancy dinner; elegant, simple and sooo delicious.

IMG_20150326_120559

IMG_20150326_120439

Here I tell you the way I made it:

Ingredients (4-6 persons)

For the base dough: (I made a base and filled it with the cream, but if you want to save time, you can do it as well without and just pour the cream in the molds)

IMG_20150326_120706

150 g flour

25 g of cane sugar

125 g of butter

1 teaspoon of water

For the filling:

4 egg yolks

50 g of cane sugar

400 ml of cream

1 teaspoon of vanilla extract

Brown sugar for dusting on top

To make the base, start mixing the flour and sugar, then add the butter and knead with your hands, add the water and continue kneading until you get an elastic dough. Make a ball, wrap the dough in film paper and put it in the fridge for 30 minutes.

IMG_20150326_120138

Strech the dough on the working table and cut into round shape to place it into the molds, make little holes with a fork, place a baking paper on top of the mold and fill it with dry chickpeas or small balls, so the dough does not rise; keep it in the oven at 190ºC for about 15 minutes.10 minutes more without the dry chickpeas if you want it more crispy.

For the filling: start whisking the egg yolks and the sugar until they get a white color. Heat the cream and vanilla in a pan and leave it until just before the boiling point.

Add the cream to the egg yolks and sugar mixture and bring to the fire. Keep stirring until it gets thicker, remove from fire just before boiling point, otherwise you will get lumps in your cream.

Let the cream cool down before filling the molds, then sprinkle brown sugar on top of the cream and burn it with a blowtorch or just leave it in the oven for a couple of minutes on the grill position.

Et voilâ! Let the cream sit overnight in the fridge (please, do something else immediately or your Crème Brûlée wont make it to the next day 🙂

IMG_20150326_184456

Enjoy!

Posted on — Leave a comment

3 ingredient pancakes (gluten free)

Yep! that´s right, only 3 ingredient pancakes, hard to believe but the results are incredible 🙂 plus is a healthy alternative to the traditional pancakes. I saw a similar recipe n the internet and I wanted to mak it right away, even I´ve made few changes to adapt it to my taste. No sugar, no flour…we are just going to need: bananas, eggs and cinnamon, ah! I also added some grated coconut (you can use your imagination).

IMG_20150313_192931

IMG_20150311_163524

Here I tell you the way that I made this delicious pancakes: 1 banana, 2 eggs, 1 teaspoon of cinnamon, 1 teaspoon of gratred coconut (if desired)

Cut the banana into a small little bits to start mixing with the eggs and cinnamon. Mix it well with the blender or a food processor until everything is well blended and you get a smooth dough.

IMG_20150311_165903

Tip: ‘What I have done differently, to get a fluffier pancakes, I first separated the egg white and whisked until I got a white foam, then, I added it to the banana and egg yolks to continue beating’

Heat the pan with a drizzle of olive oil and distribute it across the surface of the pan with the help of a paper towel. Pour a tablespoon of the mixture into the pan and flip the pancakes when they star to bubble through the center.

IMG_20150311_173109_modfif1

Serve with berries and syrup…eat!!!. Perfect for a weekend´s breakfast.

IMG_20150313_193505

Enjoy the day!

Posted on — Leave a comment

Truffels

Valentine´s Day is coming soon and we are about to see screens and displays full of red and pink color. Since I´m not really a Valentine´s Day person, this time I wanted to make a nice bite with chocolate; I think it fits perfectly for those who really like to enjoy this day and it´s also nice as a present to give anytime.
Truffels! two ways of making them and very little chances that the result goes wrong. You will be the king or the queen of the Valentine´s Day with this nice chocolate treat.
Cookie truffels and chocolate truffels!
Ingredients to prepare cookie truffels:
500 g of caramelized biscuits
250 g of cream cheese
Dark and white chocolate to make the cover
Preparation:
First smash well the cookies until they are fine, then add the cheese cream and mix well until you get a smooth dough.
Place the dough in the frigde for at least 1 hour. After that you can start giving the truffels the round shape with the help of two spoons or with your hands.
Decoration: melt the dark chocolate and the white chocolate separately and deep the cookie balls inside.


Ingredients to prepare the chocolate truffels:
1 tablet of dark chocolate
3 egg yolks
200 ml of cream
 
Preparation:
Chop the chocolate and melt on low fire stirring well. In a saucepan aside, put the cream and warm it up. Take it out from the fire when starts cooking; then, add the chocolate to the cream and mix well, after that add the egg yolks and mix until everything is well integrated and the dough is like a smooth cream (hmmm).
Put it in the fridge for about 3 hours. After that you can start shaping the truffels with the help of two spoons.
The funny part starts now, you can decorate in million different ways: cocoa powder, chocolate sprinkles, coconut, chopped hazelnuts or almonds…
You can keep them in the fridge without problems and they are delicious! That is one easy recipe right? I hope you try it at home and have a good Valentine´s week!! Enjoy!
 
Posted on — Leave a comment

Vegan oatmeal cookies

These cookies are so easy to bake that it wont take you more than 35-40 minutes. Without sugar, butter, eggs or milk…seems impossible…but yes, they are actually very yummy and very healthy.
Perfect for vegans, those who cannot take sugar or anyone who wants to eat something good, just for no reason at all 🙂
The appereance is similar to the ‘chips ahoy’ cookies, but I replaced the chocolate chips for dried cramberries.
The ingredients are:
200 gr oatmeal
3 tablespoons of olive oil
50 gr of agave syrup or sugar cane honey
Zest of one apple
A handful of dried cranberries (previously soaked in water for half an hour to hydrate them)
Pinch of salt
1/2 teaspoon of baking soda
Preparation:
 
Easy: in a bowl, mix well all the ingredients, then, with your hands, make the shape of the cookie: make a ball first and then flatten with your hand or a spoon lightly.
Put the cookies in the oven, preheated at 180ºC, for about 15 minutes.
Deep them into the vegetable milk to get the best taste 🙂

Done! Eat! Enjoy!
Have a good week ahead, see you soon,
Cheers,
Bea.
Posted on — Leave a comment

Happy little birthday and thank you!

Hi everyone!
Just a few lines to dedicate this post to have a little celebration, The Good Taste is a year old…wow!


Looking back, I realize all the things I´ve learned, but I still have many more to learn. 
Reading again some old posts, I always see room for improvement in things like writing, the way of taking pictures…but I think that is part of the journey right?
I also have to mention that now I am very quick doing the dishes, since I practice a lot 😉


One thing is clear: since I start preparing all the ingredients to bake a new recipe (that probably I have to repeat a couple of times because the first time was a total disaster and then the second one was not so tasty as I wanted it to be); going through that little magic when I place a mixture of ingredients inside of the oven and after half an hour take something different out; until I sit down to write with a big cup of tea and edit my little pictures to publish them through this small window, I am enjoying every second!!!
Of course I really want to thank those who read this baby blog; I´m always surprised to see that I have readers from Sweden, thank you so-so-so much, you are always there in every post and I love that! Also from Spain, The Netherlands, Germany, Argentina…
Thanks to the people around me: my family, for their support and, always willing to try every recipe that I bake (I get the best comments from my dad and my sister); to my mom, for the best advices; to B, when telling you new ideas about what I would like to do with the blog you always listen to me, even if they sound a bit crazy ;).

To my friends for accepting my excitement in every new post and tell me how good it looks like.

As I said in the first post, this is something to share and enjoy and I really hope that you are enjoying as well.
I send you loads of thanks and see you in the next post, looking forward to it!
Big kiss,
Bea.


Posted on — Leave a comment

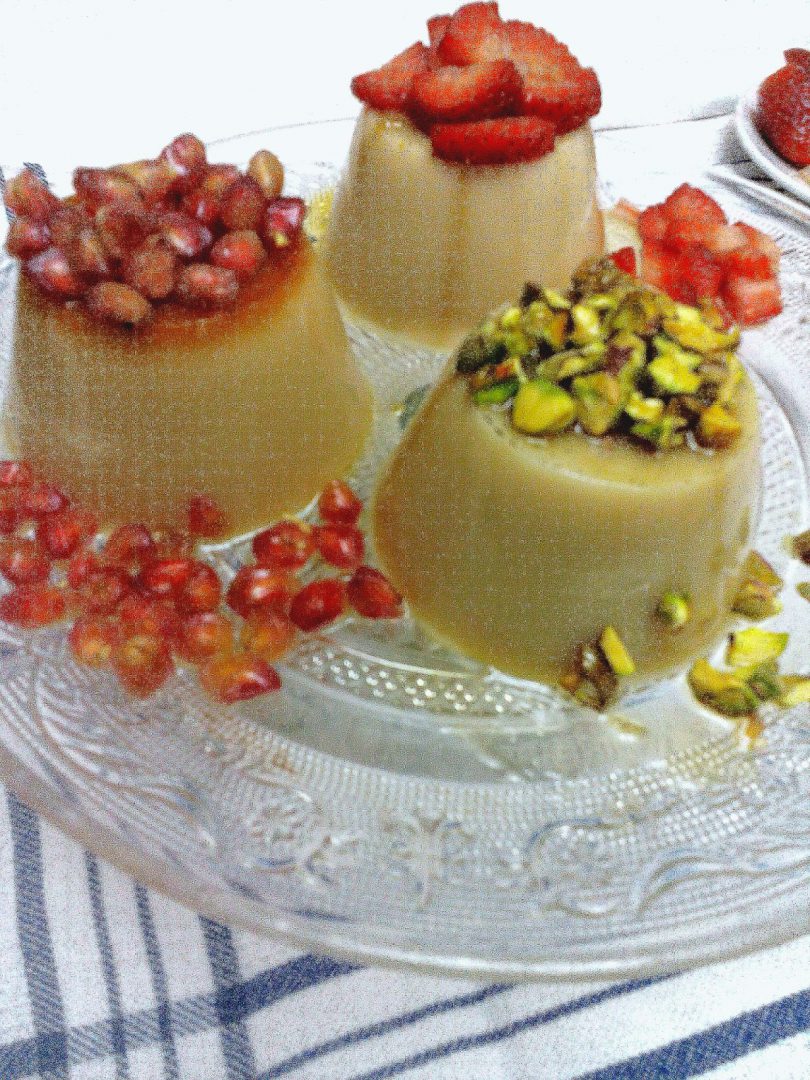
Oatmeal custard flan

Hi everyone!
For this new post, I wanted to make a very healthy recipe to start the new year and get rid of those calories that we were enjoying during the Chirstmas holidays.
A super simple tasty recipe, with very few calories and also suitable for vegans. A nice and healthy dessert: Oatmeal (custard) flan.


Here we go!
 
Ingredients:


1 liter of oat drink
Cinnamon stick
Orange zest
Lemon skin
Vanilla pod
Agar-agar (4 grams for 1 liter)
Sweetener (I´ve used Stevia, but you can also use sugar or any other that you like)
 
1º) In a saucepan, mix the Agar-Agar with a bit of cold oat drink, stir until everything is mixed. Then, add the rest of the oatmeal drink, cinnamon, vanilla, orange zest, lemon skin and the sweetener that you like. 


2º) Bring the mixture to the fire and let it boil for about two minutes. Then take away from the fire and remove the lemon skin, vanilla and cinnamon stick and place the mixture into the custard cups. 
 
3º) Let cool down a few minutes at room temperature before taking the cups into the fridge. Once in the fridge let the mixture solidifies (for about 1 hour and half).
 
4º) Once the mixture is completely cold, remove the cups. 
Now, you can decorate with anything that you like: fruits, nuts, biscuits, honey or other syrup that you may like. 
Enjoy!!!
 
 
I´ve decorated with pistachio, pomegranate, strawberry and smashed cookies


I hope you like this recipe; Have a nice day :)!!


Posted on — Leave a comment

Baked peaches

A sweet recipe, but sugar free, easy, healthy and perfect to have like a snack…sometimes is really good to eat something sweet without calories right?
I´ve seen several recipes for baked peaches and this time I wanted to make my own; although we are not in the peaches season yet, I was lucky and I could find them at the grocery store in my neighborhood, but this recipe, perfectly can be made with canned peaches, they will give more sweetness to the recipe.
Ingredients:
4 peaches
To make the sauce:
Orange juice
1/2 cup of water
a pinch of ground cinnamon
a pinch of ginger
a splash of cognac
To serve:
I think vanilla ice cream fits perfectly, but this time I wanted it to be a light recipe, so I used natural yogurt with sugar cane honey on top.
1º) Peel the peaches and cut them into wedges, then place them in the baking dish and sprinkle a teaspoon of olive oil on top. I also used rosemary sprigs. Put it in the oven at 190ºC for about 25 minutes.
2º) In another pan, mix the water, the orange juice, cinnamon, ginger and the cognac. Put it on low heat.
3º) When the peaches are ready, take them from the oven and sprinkle over them the orange juice sauce that you just made. Leave like this for about 5 minutes in the baking dish before serve them.
Time to serve…and eat!!! as I said before, I didn´t use sugar, although the peaches will be also nice as you sprinkle some brown sugar on top.
I hope you liked the recipe, you can make your own at home, as you can see is very easy and you can combine whith different ingredients.
Have a good week ahead…and see you soon!
Cheers,
Bea.