Publicado el — Deja un comentario

Cupcakes de Chocolate

Hola! para mi primer post oficial, he elegido un extra de chocolate!!: cupcakes de chocolate con glaseado de chocolate!!. Están riquísimos y es una buena manera de darnos un capricho (casero ;)) el fin de semana

Además, después de decorados, quedan perfectos como detalle regalo, como es el caso. 

La elaboración es bastante fácil y sencilla, que seguro se puede ir mejorando con la práctica;)


Los ingredientes que necesitamos son: 

Cupcakes:

* 85 gr de mantequilla

* 75 gr de azúcar moreno
* 100 gr de azúcar blanca
* 185 gr de harina de repostería
* 2 huevos
* 20 gr de cacao en polvo
* 1 sobre de levadura quimicar
* 1 pizca de sal
* 250 ml de leche
* Una pizca de esencia de vainilla
* 120 gr de chocolate para derretir


Comenzamos derritiendo el chocolate, removiendo constantemente hasta que se funda por completo. 
En un bol, mezclamos el cacao en polvo, la harina, la pizca de sal y el sobre de levadura. hasta que todos los ingredientes se hayan integrado bien
En otro bol batimos la mantequilla (con la batidora eléctrica o a mano) hasta que tenga un aspecto suave y esponjoso. Después añadimos los dos tipos de azúcar y seguimos batiendo hasta que tengamos una mezcla esponjosa.


Añadimos los huevos a esta última mezcla por separado y batiendo bien, seguidamente añadiremos el chocolate con la esencia de vainilla y seguimos mezclando. 
 
Ahora añadimos el cacao en polvo y la harina (en varias veces) y alternándolos con la leche. Añadir cada parte una vez que la otra esté bien integrada.
Ya tenemos nuestra masa para cupcakes! ahora con la ayuda de dos cucharas se vierte la masa en las cápsulas de papel (llenamos hasta 2/3 más o menos). 
Metemos al horno, precalentado a 170 º y lo dejamos hornear sobre 25-30 minutos.
 
 
Glaseado de Chocolate
* 50 gr de mantequilla
* 250 ml de nata liquida
* 300 gr de chocolate de cobertura
 
Comenzamos derritiendo el chocolate y reservamos. 
Hervimos la nata. Después se añade al chocolate (en veces separadas), mezclando bien.
Por último añadimos la mantequilla y batimos bien hasta incorporar por completo. 
Dejamos enfriar varias horas nuestro glaseado a temperatura ambiente (lo ideal es dejarlo toda la noche). 
Una vez que haya enfriado, la ponemos en un bol y batimos hasta que nos quede una mezcla con una textura suave.
Ya podemos decorar nuestros cupcakes!!!
Espero que lo intentéis hacer en casa, son perfectos para disfrutar de una merienda con amigos el fin de semana.
Publicado el — Deja un comentario

Sobre ‘The Good Taste’ / About ‘The Good Taste’

Editada2
Hola a todos/as,
después de pensármelo mucho, he decidido que ésta va a ser mi primera entrada como blogera. Me llamo Beatriz, Asturiana, aunque vivo en Bélgica desde hace un tiempo. Apasionada de la vida saludable, el ballet, yoga y fotografía, entre otras cosas; aquí me gustaría empezar a compartir con vosotros y aprender a la vez diferentes tipos de recetas dulces y hechas en casa, sanas y…no tan sanas :). (Cupcakes, bizcochos, muffins, bocaditos, snacks..etc)
Precisamente porque prefiero la comida natural, desde hace ya un tiempo he empezado a elaborar en casa mis propios postres, ayudándome también de la sabiduría de mi madre por supuesto, inspirándome en otros blogs y siempre aprendiendo de cada receta y experiencia.
Así, me he enganchado a los postres hechos en casa naturalmente, conociendo cada ingrediente que llevan y he de decir que en casa no entra ya bollería industrial.
Cuando hago un postre, lo que más me gusta es ver la evolución hasta llegar al resultado final y disfruto más si lo hago para alguien y poder compartirlo.
The Good Taste se trata de eso, de compartir con vosotros, de aprender y de seguir experimentando.
Vamos allá! empezamos?
English version here
Hi everybody,
I´ve been thinking for a while and finally I have decided: this is my first post as a blogger. My name is Beatriz, I am spanish (Asturias) but I live in Belgium. I´m passionate about healthy life, ballet, yoga and food photography among other things. Here I would like to share with all of you different types of recipes (healthy and someties ..not so healthy  :))
Because I prefer to eat healthy food, I started to make myself cakes at home, also with the help and wisdom of my mother, and also getting inspired from other food bloggers, always learning from every recipe and experience.
So, I like homemade cakes and when I´m working on them I like to see the evolution untill I see the end result, but what I like most is to make it for someone else, give it as a present or enjoy it with friends and family.
The Good Taste is about sharing with you and learn together.
Here we go, Shall we start?
Publicado el — Deja un comentario

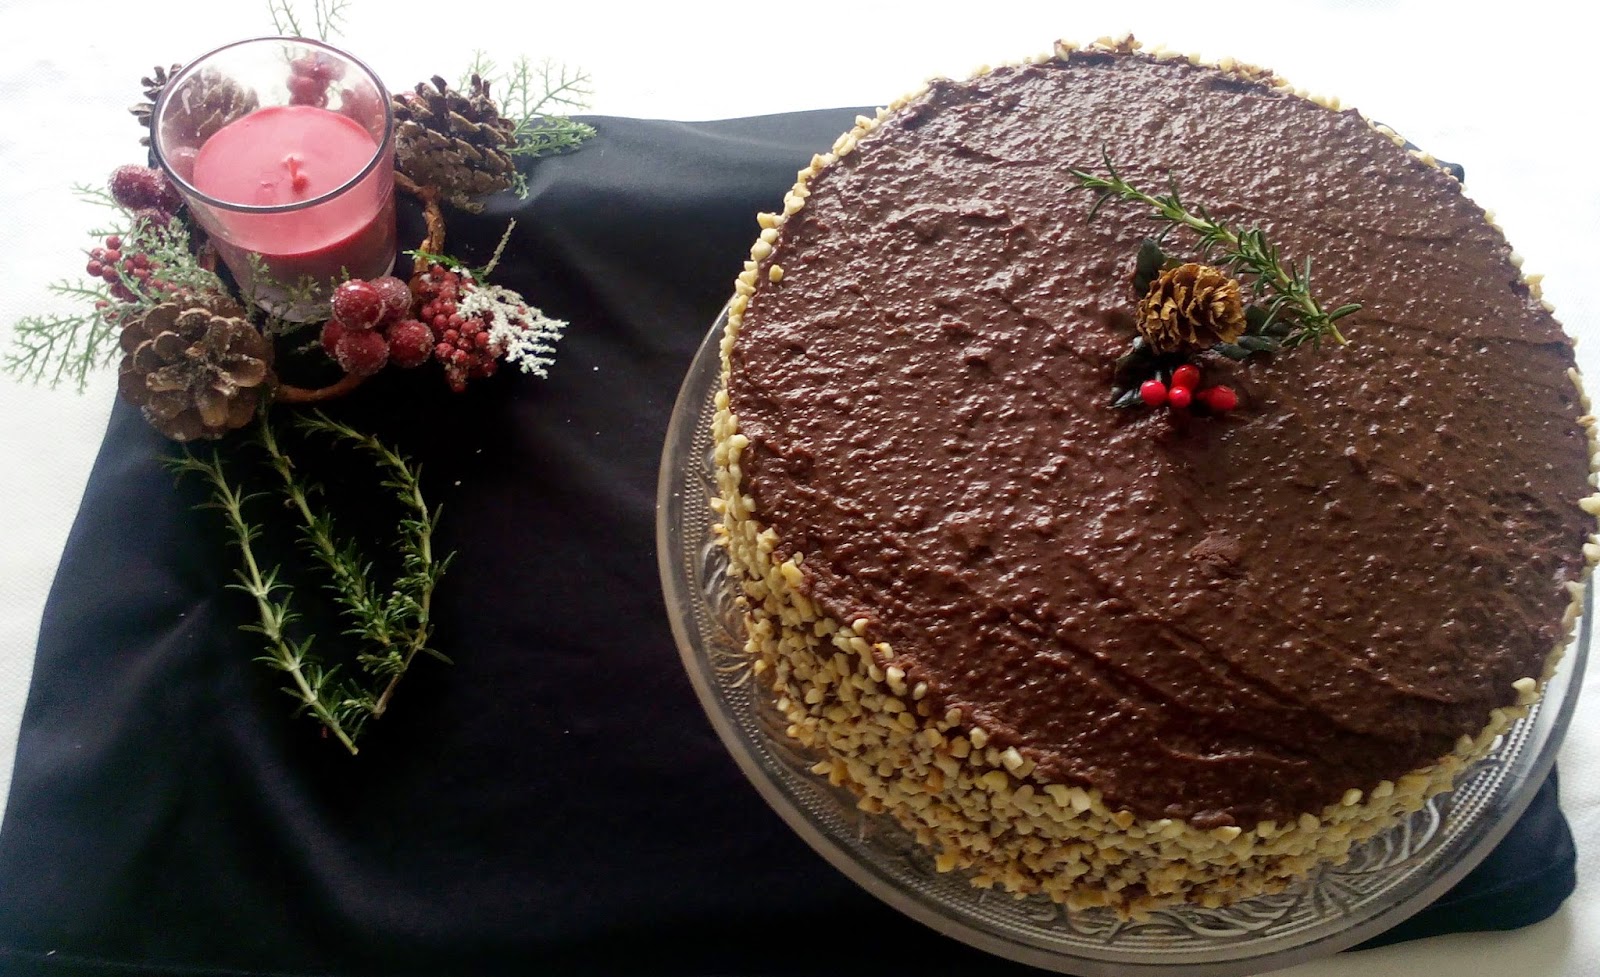
Tarta de Chocolate para Nochevieja / Chocolate cake for New Year´s Eve

(English version below)
 
Hola a tod@s!
Hoy seguimos con la ‘serie’ de postres para la época de Navidad. Una tarta de chocolate sencilla, elegante y perfecta como guinda a la cena de Nochevieja.

Hmmm. hmmm..hmmm, ojo! querréis repetir!!! 🙂

Empezamos!
Ingredientes para el bizcocho:
 
175 g de mantequilla a temperatura ambiente
175 g de azúcar
175 g de harina
3 huevos
3 cucharadas de caramelo líquido
40 g de almedras molidas
1/2 sobre de levadura en polvo
40 g de cacao

1 pizca de sal

Ingredientes para la cobertura y el relleno:
 
225 g de chocolate puro
225 g de mantequilla
55 g de azúcar moreno
5 cucharadas de leche condensada
1/2 cucharadita de azúcar avainillado
1º) El primer paso es mezclar todos los ingredientes para la cobertura en un cazo y lo ponemos a fuego lento, mezclando bien, hasta que todo se haya derretido.

A continuación vertemos la mezcla en otro recipiente y dejamos que se enfríe. Tapar y meter en la nevera por 1 hora.

2º) Precalentamos el horno a 180º C y forramos el molde (el mío es de 22 cm ) con papel de horno.
3º) Para la mezcla del bizcocho, primero batimos la mantequilla y el azúcar; una vez que estén bien integrados, añadimos poco a poco los huevos batidos, después el caramelo liquido y la almendra molida.
4º) En un bol a parte, tamizamos la harina, el cacao y la pizca de sal y las añadimos a la mezcla anterior. Si la mezcla está demasiado espesa podemos añadir un poco de agua.
5º) Ponemos la mezcla en el molde y dejamos en el horno a 180 ºC durante aproximadamente 35 minutos.
Después sacamos el molde del horno y dejamos enfriar el bizcocho durante 5 minutos. A continuación, retiramos el molde y dejar que se enfríe del todo.

En este caso yo he hecho dos bizcochos ya que quería un pastel alto (podéís repartir la masa en dos moldes o hacer otra mezcla para otro bizcocho con los mismos ingredientes)

6º) Por último rellenamos el bizcocho con el relleno de chocolate (lo cortáis a la mitad si sólo habéis horneado un bizcocho o si tenéis dos, ponéis uno encima del otro después de haberlo rellenado).
También usamos el relleno para cubrir el resto de la tarta. Al final, a modo de decoración, yo he puesto por los laterales dados de almendra, creo que queda un resultado muy elegante, acorde con la Nochevieja.
Para acompañar el pastel, he hecho un vino caliente especiado casero, muy típico de Alemania y de los países del norte de Europa que se toma durante el periódo de Adviento; una buena manera de combatir el frío.
El vino caliente especiado es una buena opción para acompañar un trozo de tarta

Ya está! no me digáis que no es una receta sencilla, además podéis usar vuestra imaginación a la hora de decorar.

Espero que tengáis una buena semana y disfrutéis todos los días 🙂
Hasta pronto,
Bea.
—————————————————————————————–
English version here:
Hi everyone!

I would like to continue with the ‘Christmas time dessert´s series’. A good chocolate cake, simple, elegant and perfect to finish the New Year´s Eve dinner and start de New Year´s celebration.

Hmmm…hmmm… hmmm! careful! you will want more than one piece!! 😉

Let´s start!
Ingredients for the cake:

175 g of butter (room temp.)
175 g of sugar
175 g of flour
3 tablespoons of liquid caramel
40 g of ground almonds
2 teaspoons and half of baking powder
40 g of cocoa
1 pinch of salt


Ingredients for the filling:

225 g pure chocolate
225 g of butter
55 g of brown sugar
5 tablespoons of condensed milk
1/2 teaspoon of vanilla sugar
 
1º) First we mix all the ingredients for the filling in a pan; low heat until everything is well melted.

Then, pour the mixture into another bowl and let cool down, cover and place in the refrigerator during 1 hour.

2º) Preheat the oven at 180 ºC and cover the mold with baking paper.
3º) For the cake mixture, first we mix the butter and sugar, once they are well integrated, gradually add the beaten eggs, then the liquid caramel and the ground almonds.
4º) In a separate bowl, sift the flour, cocoa and pinch of salt and add to the previous mixture.
5º) Put the mixture into the mold and leave in the oven at 180º C for about 35 minutes. Then, take the cake out from the oven and let cool down for 5 minutes. Then, remove the mold and let cool down completely.

In this case I´ve made two cakes, you can divide the dough in two or make another separate cake with same ingredients and measures, so the cake will be taller (that is what I wanted).

6º) Finally we fill the cake with the chocolate (which you will cut thorugh the middle if you have made just one cake. If you have made two cakes, put one on top of the other after filled).
We also use the filling to cover the rest of the cake.

For the decoration, I used almond cubes, I think it looks pretty elegant, just ready to enjoy during New Years´s Eve.
We need something to drink with the cake!! I made mulled wine or Gluhwein, a traditional drink from Germany and northern countries of Europe, especially around Christmas.

Mulled wine it´s a nice option to drink while enjoying the cake
That´s it! I think it is a simple recipe and you can also use your imagination when you are decorating it.
I hope you try it at home; and really really hope you have a veeery nice week ahead and enjoy every day 🙂
Cheers!
Bea.

Publicado el — Deja un comentario

Rosquillas Light con naranja y canela / Light donuts with orange juice and cinnamon

Hola a tod@s!
Hoy una receta sencilla para saciar las ganas de dulce, pero de una manera sana y sin apenas azúcar. Rosquillas ligeras de naranja y canela. Empezamos!
Hi everybody!!
Today I would like to share a simple recipe for the time we feel like eating something sweet, but in a healthy way and almost without sugar. Light donuts with orange juice and cinnamon. Here we go!


Ingedientes/ Ingredients
– El zumo de dos naranjas/ orange juice (two squeezed oranges)
– Medio vaso de aceite de oliva/ half a glass of olive oil
– Medio vaso (yo he puesto un poco menos) de azúcar integral o de caña/ half a glass (or less) of brown sugar
– Medio vaso de leche desnatada (o soja, yo la he utilizado en este caso))/ Half a glass of milk or soy (I used soy in this case)
– Una cucharada sopera de endulcorante/ a tablespoon of sweetener 
– Una cucharada sopera de bicarbonato/ a tablespoon of sodium bicarbonate
– Ralladura de limón/ lemon zest
– Ralladura de jengibre/ grated ginger
– Canela molida/ground cinnamon
– Medio kilo de harina/ half a kilo of flour
 
 
Mezclamos bien todos los ingredientes y amasamos. Vamos añadiendo más harina cuando veamos que la masa es más difícil de manejar.
Para hacer la forma de las rosquillas cogemos un trozo de masa y con las manos (podemos humedecerlas un poco) hacemos una bola. Después, con ayuda del dedo índice, hacemos un agujero en el centro de la bola y las vamos colocando en la bandeja del horno.
Metemos al horno precalentado a 180 grados durante 30 minutos.
Mix well all the ingredients. Start to add more flour if needed (when we see that the dough is difficult to handle).
To make the shape of the rolls: take a piece of the dough and make a ball with your hands, after that with your index finger, make a hole in the middle of the ball.


When all of them are ready on the oven tray, place them in the oven during 30 minutes 180ºC.


Tradicionalmente las rosquillas se suelen freir , pero creo que esta es una sana alternativa, además salen igual de ricas.
Normally, this rolls or donuts are fried, but I think this one is a healthy alternative and they taste great!
Os animo a que probéis a hacerlas en casa!! Hasta pronto!
I hope you try this at home!! See you soon!

Follow my blog with Bloglovin